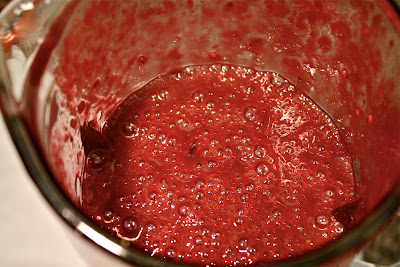
Chilled Berry Soup

>> Friday, February 26, 2010


So, I've been a little absent lately from the blogosphere.

Life's been crazy! I have about 120 unready blogs in my reader!

I went to Texas... and ate a whole lot of good food! That's definitely not the reason I went to Texas, but it was a nice benefit. Ten of us from Southbay Church staff went to Texas to go to the C3 conference at Fellowship Church. What an amazing time of growth, refreshment, encouragement, and fellowship!

Most of us on staff here at Southbay are from the south east, so when you go to Texas, that's pretty darn close to the south for us. Chick-Fil-A, Carraba's, Cracker Barrel, and sweet tea were all must have's on our list. My poor friend Aimee had never even heard of any of these restaurants, and didn't have much say the entire week of where we were going. Just had almost all her food ordered for her and went with the flow. She was a trooper, and ended up of course liking some good Southern food!

What's your favorite food you can't get all the time? I would have to add Dunkin' Donuts iced coffee to my list!

Carraba's for some Chicken Bryan!!!

The whole gang at Cracker Barrel, enjoying the rocking chairs and the big front porch!
"Look, my sausage and eggs make a face!"

Now onto the food! (as if I wasn't already talking about all those restaurants. Can someone bring me some Chick-Fil-A!?)

I made this Chilled Berry Soup from the all-new Ultimate Southern Living Cookbook (Texas made me crave all the good Southern food). I love this cookbook - my awesome friend Staci got this for me several years ago, and I love it. Such a great cookbook!!! This soup has the most incredible color, and it's super yummy. It's pretty sweet, but it would be great for an appetizer, and could even be a great dessert!

Chilled Berry Soup (Adapted from the Southern Living Cookbook)

Ingredients:
2 cups fresh blackberries
2 cups fresh blueberries
1 cup orange juice
1/2 cup sugar
1/4 tsp. ground cinnamon
1/8 tsp. salt
1 Tbs. fresh lemon juice
1 1/2 - 2 cups fat free half and half
Garnishes: whipped cream, fresh mint

Directions:
1. Measure out and wash berries

2. Place first 5 ingredients in a large saucepan, and bring to a boil over medium-high heat, stirring often.

3. Remove from heat, and cool slightly.

4. Process berry mixture and lemon juice in a blender or food processor until smooth, stopping to scrape down sides.


5. Strain berry mixture through large kitchen strainer back into saucepan in order to separate seeds.

6. Cover and chill until cool and ready to serve. Garnish if desired with whipped cream and fresh mint.


Read more...

Treats for your Sweets

>> Sunday, February 14, 2010


When my husband was in college he made up a fake holiday in honor of Valentine's Day.

S.A.D.

It stands for Singles Awareness Day. He wore all black, made a pin to wear on his shirt, and walked around announcing it all day.

Isn't he lucky that now he has someone to make him a yummy Valentine's Day meal, mostly healthy, and even makes dessert! :) Just joking, I'm really the lucky one!!

I made these meringues for us, mostly because it's just the two of us, we're trying to be healthier these days, and we just had lots of chocolate cake last week.

And they were SUPER easy! They are such a great snack! The vanilla really taste like toasted marshmallows! I love buying the meringues from Trader Joe's, but why when these are so easy to make, and I had everything on hand already. I separated the meringue batter and made half vanilla, half chocolate, piping into hearts, but you can make all chocolate, making drops, fill with fruit, whatever you want!!

What did you do for Valentine's Day??

We spent much of the day at church for our two services, but after a long nap, letting the puppy play, and cooking for the two of us, the day was perfectly complete with hours of endless Olympic obsession! Is anybody else as obsessed with the Olympics as I am?? What's your favorite sport?

Chocolate and Vanilla Meringues (Adapted from Fix It and Enjoy It Healthy Cookbook - With the Mayo Clinic)

Ingredients
2 egg whites
1/4 tsp. cream of tartar
1 teaspoon vanilla
1/2 cup sugar
1-2 TBS. Dry cocoa powder, unsweetened

Directions:
1. Preheat oven to 250 degrees and line cookie sheet with parchment paper or silpat.

2. In mixing bowl, separate egg whites into bowl.

3. Combine with cream of tartar and vanilla extract until soft peaks form.


4. Beat in sugar, 1 TBS. at a time until stiff peaks form.

5. Divide batter in half if desired for vanilla meringues.

6. With remaining batter, sprinkle 1 Tbs. cocoa powder for half batter or 2 Tbs. for full batter over top, and fold in gently by hand.

7. Place batter in pastry bag affixed with preferred tip. Pipe hearts or drops onto silpat or parchment paper.

8. Bake ~ 45 min. or until dry to touch in thickest part of meringue.

9. Remove meringues from oven and cool.

10. Serve as desired with fresh fruit on top or sprinkled with powdered sugar.


Read more...

Blog Feature

>> Thursday, February 11, 2010

Very exciting news!!! Found out yesterday that my 2 cheese risotto recipe will be featured on Mary DeMuth's website - A Daily Recipe tomorrow!! Yes, that's Friday, so I know everyone will be daydreaming about their weekends, hurrying through your days, eating out for lunches to make the day go by a little faster, eating old candy sitting on your coworkers desks (well maybe it's new candy now since Valentine's Day is Sunday)


But make a few minutes to go check it out, share a little love on the website, and support Mary for putting me on her website!!! She's pretty cool!

It's the first time I've had anything like this ever written up or put anywhere for the public, so I'm pretty excited that she selected mine to post!

Hurry up now, go check it out! :)

Read more...

If At First You Don't Succeed...

>> Saturday, February 6, 2010


Common phrase of mom's, coaches, therapists, and 2nd grade teachers everywhere.

Well, I definitely needed to apply this to my recipe this week. I don't even have a picture of the hot mess that ensued from my first attempt. It's really my own fault, I know I shouldn't have tried half the things that I did, and time was definitely not on my side.

Rule # 1 of trying something new: Don't start the new recipe at 6:30 when you are supposed to be somewhere at 6:30!

But what I did as a result to "try, try again" was seriously AMAZING!! You'll have to read on to find out the details, but more about my failings....

It all started as an innocent attempt to do a small favor for a friend. Our friend's birthday was this week, and since his wife, Mandy, just had a baby, I offered to make the cake to take the burden off of her. I know she loves to bake, and she makes amazing cakes, but I was just trying to help her out.

Well, I didn't get home from work till 6:30, which was the time we were due at the party. Luckily, I had made the cake the night before, making a yummy chocolate cake from Sugar Plum. But I had to make the frosting that night. I had my husband start it as I was on my way home, but he self admittedly can't even read a recipe - sorry babe, but that was REALLY evident that night! So, I had to remake everything he had already made! :) ha. Well, the ganache was too thick, didn't spread right, and I didn't have time for it to harden, so the piping on top just slid off the sides. Really, like I said, a hot mess!

So, because I love my faithful five readers so much (including my husband, ha), I decided to start over and give you something that I was proud of and knew that you might actually want to replicate. So, some time later, I'll post the pictures/recipe of the original chocolate cake I made, but for today, are you ready for something AMAZING!!! Something you will seriously not believe!?

I made mini cakes in cans!!! Yes, like old cleaned out bean cans!!! Seriously, isn't that amazing!! I guess if you really want to get down to it, you could call me California Green, since I'm recycling my old cans! ha. You won't believe how easy it is. Just do it!!

I followed a recipe for batch cakes, so it makes 2 mini cakes rather than needing to make an entire cake (making another full cake just to get the pictures part of the blog was so not in the plan for the day, or the diet! It worked out nice that we had some dinner plans tonight with some great friends, so I was able to bring these mini cakes over and we enjoyed the SECOND fruit of my labor!


Here's a picture of the cool cakes once they are baked! It's perfect for Valentine's Day so you don't have to make an entire cake for you and your sweets!

The second amazing part about this recipe is that There's a secret ingredient in the buttercream frosting! Ovaltine! Yes, I said Ovaltine. And boy, oh boy, is it really more of a secret weapon than a secret ingredient. Joy the Baker really outdid herself with this one! I can't wait for you to try it... go on now, go.. You must try!

And third - ganache! You really just can't go wrong with smooth, rich, chocolate coating all over the entire cake.

**WARNING** There are a BUNCH of pictures for this recipe. It's really not all that complicated, I think I just got a bit picture happy! It was so amazing and delicious looking that I couldn't help myself.

Mini Chocolate Ganache Cakes (Adapted from: Cake on the Brain, Joy the Baker, and Me)

For the Cake:
Ingredients
2 14.5 oz. cans, cleaned
1/4 cup plus 2 T all-purpose flour
3 T vanilla yogurt
Yolk of 1 large egg [I used the whole egg]
1/2 t pure vanilla extract
3 T unsalted butter, melted and cooled
2 T unsweetened cocoa powder
1/8 t baking soda
1/8 t salt
1/3 cup sugar

1. Preheat oven to 325 degrees. Grease the cans and cover with flour, shaking off excess. Place pans on baking sheet and set aside.


2. Combine the yogurt, egg, and vanilla in a small bowl, and whisk to mix. Gradually pour the melted butter into the yogurt mixture, whisking constantly.


3. Sift the flour, cocoa powder, baking soda, and salt into a medium-size mixing bowl, and then whisk to blend well. Add the sugar and whisk to combine. Add the yogurt mixture and whisk just until the dry ingredients are moistened.


4. Spoon the batter into the prepared cans, dividing it evenly between them. Bake the cakes until a toothpick inserted into the centre of one comes out clean, 25 to 35 minutes. Mine took exactly 35 minutes before I had moist crumbs on a toothpick.


5. Allow to cool on cooling racks 15 minutes before taking a knife and separating edges from can. Invert can, allowing cake to come out. Cool cakes completely.


This is my new nifty toy from Ikea. I love Ikea. So, it's just this nifty thing that cuts a cake for you automatically. It worked perfectly. You get the idea, the next step is to cut the cute little cakes in half.

Secret Ingredient Chocolate Buttercream Frosting ( I halved this recipe for the mini cakes, and still had leftover)

INGREDIENTS

1/2 cup (3 sticks) unsalted butter, softened
1 cup cocoa powder
3/4 teaspoon salt
4 cups powdered sugar
2 teaspoons vanilla
1/4 cup milk
1 cup heavy cream
2/3 cup Ovaltine


DIRECTIONS

1. Cream together butter, cocoa, and salt. Mixture will be very thick.


2. Turn off mixer, scrape down sides, and add powdered sugar. Add milk and vanilla slowly with mixer on slow until incorporated.


3. As the sugar incorporates, turn up the speed to medium to beat the frosting until thick consistency, and smooth.

4. In a separate bowl, whisk together Ovaltine and cream until smooth. Add to frosting slowly until fully incorporated. You may not need all of cream mixture. I added a little powdered sugar at end to get thicker consistency for piping.


GANACHE


INGREDIENTS


1/4 cup semisweet chocolate chips


3/4 cup heavy whipping cream


DIRECTIONS


1. In a small saucepan heat cream until just heated, not boiling. Remove from heat


2. Add chocolate and stir until smooth and creamy.

FOR ASSEMBLY:


1. Using buttercream frosting, apply a very thin "crumb" coat over entire surface of both cakes. Place in freezer for approximately five minutes until hard.

2. Apply buttercream frosting over entire surface of both cakes very liberally. Place in freezer and allow to harden.

3. Place cakes on cooling rack, and place on top of cookie sheet or cutting board. Using warm, but not hot ganache, pour small amount over center of cake and using frosting spreader, spread over entirety of both cakes, smoothing over sides. It's okay if this layer doesn't look perfect. It's like the ganache "crumb" coat. Tap cooling rack in order to pop any bubbles and smooth out top. Place in freezer for 5-10 minutes until hardened.
4. Use remaining ganache, and pour liberally over top, allowing to spread over sides, and drip down. Shake cooling rack again to pop bubbles and make smooth top. Freeze for 5-10 minutes until hardened.
5. Using piping bag or ziplock bag with hole cut in corner, pipe rosettes, stars, or desired shape around edges, or decorate as desired. Move to serving plate using spatula. Cut and ENJOY!!!

Read more...

Celebrate Good Times

>> Monday, February 1, 2010


Yes, we're celebrating all right! We're celebrating the last of the vegan posts.... at least for a while. Coincidentally, my husband and I decided that we actually really like the vegan diet. We've really explored a lot of new food options, tried many new recipes, and decided we even like soy milk more than regular milk.

We might start eating all vegan...Ha, "Don't get crazy"

However much we do like eating vegan, we did decide to celebrate the end of the three week fast. It happened to work out perfectly that Saturday was day 90 of P90X, Sunday was day 21 of the fast, and our friend's Aimee's birthday was Thursday. We did a lot of celebrating! :)

Cheesecake Factory, Coffee, Friends, Chicken, did I mention COFFEE!!!! And yes, it was Peet's.

So, for the last vegan post... for awhile, I decided on this yummy Black Bean Salsa:

I originally made a recipe similar to this a few years ago off the back of a Libby's black bean can. It was good, but needed a bit of tweaking. I also discovered during this fast that I don't think Libby's black beans exists anymore! Do they still make Libby's black beans in your area? What about the pumpkin puree from Libby's?

Anyway, here is the recipe of what I can remember, and a little bit of extras. We made the salsa, heated up some corn tortillas, and made tacos with the bean salsa, brown rice, and guacamole! We didn't even miss the sour cream and cheese... No really, we didn't miss it! (Can you hear me trying to convince myself!) You can also just eat this as an appetizer with chips!

Black Bean Salsa: (Adapted from Libby's Black Beans)

Ingredients:
  • 1 (15 ounce) can black beans

    1 (15 ounce) can garbanzo beans

  • 1 (15 ounce) can corn
  • 1/2 medium red onion, chopped
  • 1 small red pepper, chopped
  • 1 1/2 teaspoons cumin
  • 1 jalapeno, seeded and diced
  • Juice of 1 lime
  • 2 tablespoons olive oil
  • 1 tablespoon red wine vinegar
  • 1 1/2 tablespoons cilantro, chopped
  • 1/2 teaspoon sea salt


Directions:
Mix everything together, let rest for 20-30 minutes, and enjoy!


Read more...